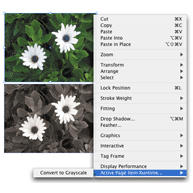
Convert placed color images to grayscale straight in InDesign. No Photoshop round-trip, no duplicate files. Your original images on disk are never changed.
What it does
Select a color image in InDesign and choose Force Render as Gray either from the image’s context menu or from the API menu. That’s it.
Color2Gray uses InDesign’s built-in color conversion to show, print and export the image in grayscale while the file on your hard drive stays untouched.
For CMYK output the image prints on the black (K) plate only, in true grayscale reproduction. Choose Render Normally on the same image to switch back.
This instead of: open each photo in Photoshop → convert → save a second file → relink in InDesign → manage twice as many files.
Good for
-
Black-and-white printing of color ads and photos
-
Mixed layouts: some images color, some grayscale, same page
-
Client proofs showing how color will reproduce in grayscale, non-destructively
-
Printing grayscale without creating duplicate image files
-
Quick “how would this look in B&W” experiments
How to use
-
Select one or more color images.
-
Open the context menu: right-click (Windows) / Control-click (Mac), or open the API menu in the menu bar.
-
Choose Force Render as Gray.
-
Done. The image now renders gray. To undo, choose Render Normally the same way.
Which images work
| Works well | Not supported |
|---|---|
| JPEG, TIFF, PNG, simple bitmap photos | Vector art (Illustrator, EPS), complex multi-layer PSD, placed InDesign documents |
Complex Photoshop files sometimes work if you save them as TIFF first.
Limits
-
Uses InDesign’s default color-to-grayscale conversion. For custom curves or channel mixing you still need Photoshop.
-
Always check printed output before going live on color-critical images.
System requirements
-
InDesign 2025 or newer, macOS or Windows
-
(required supporting plug-in, free, also installed manually, see below)
Installation
Color2Gray needs a supplemental plug-in called APID ToolAssistant.
Both Color2Gray and APID ToolAssistant are installed by hand. PluginInstaller does not install them (it is only used later to purchase a licence).
-
Install APID ToolAssistant first: follow the steps on its . No APID ToolAssistant licence is needed to run Color2Gray (see Pricing). Don’t restart InDesign yet.
-
Download and unzip it (contents may sit inside a nested folder). You should see the Color2Gray
.splnfile plus some helper files (a few more on Windows). -
Copy all of those items into the same place as the APID ToolAssistant items: InDesign’s
Plug-Insfolder, or the optionalRorohikosubfolder inside it if you made one:-
macOS:
/Applications/Adobe InDesign 2026/Plug-Ins/ -
Windows:
C:\Program Files\Adobe\Adobe InDesign 2026\Plug-Ins\
(Change the year to match your InDesign. Authenticate as administrator if prompted.)


-
-
Launch InDesign. Force Render as Gray now appears in the image context menu and in the API menu.
Updating
Color2Gray does not update itself. Re-download from this page and copy the items over the old ones (quit InDesign first).
Pricing
-
20-day free trial: full functionality, no restrictions.
-
$29 USD per computer, per year (excl. tax), annual renewal.
-
No APID ToolAssistant licence required.
To buy after the trial:
-
Install and open .
-
Switch to Available Software.
-
Select Color2Gray.
-
Choose Buy from the ⋯ menu and follow the checkout.
Troubleshooting
No “Force Render as Gray” in the context menu
-
Confirm APID ToolAssistant is installed and working (an API menu shows in the InDesign menu bar).
-
Make sure the Color2Gray items and the APID ToolAssistant items are in the same location (both directly in
Plug-Ins, or both in the sameRorohikosubfolder). -
Restart InDesign after installing.
Image won’t convert
-
Best with JPEG, TIFF, PNG. Save complex PSDs as TIFF and retry.
-
Vector graphics are not supported.
-
Right-click the image → Render Normally
Step 4: Purchase license (after trial)
- Open PluginInstaller. Verify your account is unlocked.
- Select Available Software and use the search field to look for Color2Gray.
- Use the Buy option in the … menu. Purchase license for $29/year
- Activation happens automatically
Important limitations
Good conversion, but not perfect: Color2Gray uses InDesign’s default color-to-grayscale conversion. For specialized conversions (custom curves, color channel mixing, etc.), you’ll still need Photoshop.
Test before going live: Always check your printed output before finalizing, especially for critical color-sensitive images.
Who should use Color2Gray
- Publishers – Quick grayscale conversion for mixed-format publications
- Designers – Experiment with B&W looks without permanent changes
- Print shops – Handle client requests for grayscale output efficiently
- Magazine/newspaper producers – Convert color content for B&W sections
- Anyone who regularly needs to switch between color and grayscale images
Troubleshooting
Plug-in won’t appear in context menu?
- Make sure APID ToolAssistant is properly installed first
- Verify all needed plug-ins are in the same Rorohiko folder
- Restart InDesign after installation
Image not converting?
- Color2Gray works best with JPEG, TIFF, and PNG files
- Complex Photoshop files may not work – try saving as TIFF first
- Vector graphics aren’t supported
Need to remove conversion?
- Right-click the image and choose Render Normally
- Original image file is never changed
Ready to try it? Download the files above and start your free 20-day trial today!