If you’re publishing a newspaper, magazine, newsletter… this will enable you to generate Sudoku puzzles directly into an InDesign document – for example, for your ‘Puzzle Page’, or to generate whole booklets with Sudoku puzzles.
You’re in control of the look and feel of the generated Sudoku – and our generator takes care of actually building the puzzles for you, straight into the final page. No more copy-paste or error-prone retyping needed!
A fully functional time limited demo version of this plug-in for Adobe® InDesign® CS, CS2, CS3, CS4 or CS5 can be downloaded further down this page. Try it out; if you like what it does, US$149.00 (excl. tax/GST) will buy you license. More info about our licensing system can be found by clicking here.
We provide optional customization services too:
- We can assist you with customization and integration of this functionality into an existing workflow
- We can build custom template layouts for you
Please send your customization requests to [email protected]
On top of being an able Sudoku puzzle generator, SudokuGenerator offers a the following additional features:
- Generates symmetrical puzzles (user-selectable symmetry: horizontal, vertical, diagonal, or a combination thereof).
- Generation of multiple puzzles
- Can generate 6×6 and 16×16 Sudoku
- Can generate Sudoku using different glyphs instead of 1 to 9.
- Can optionally ‘cover’ the non-hint cells with a frame, instead of leaving them white.
The generated Sudoku are stored in two InDesign tables – one with the pattern of digits or glyphs, and another one ‘in front’ which obscures some of the solution.
The solution to the puzzle is provided in a separate solution frame. Alternatively, you can also expose the solution by removing the frontmost ‘obscuring’ table.
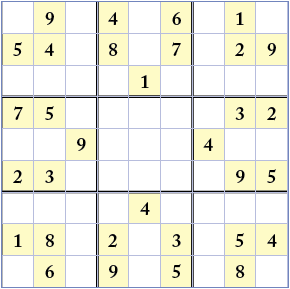
This is a symmetrical Sudoku generated using the default style of one of the provided template files:
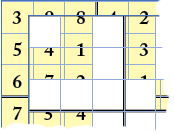
Interesting detail: It consists of two tables piled on top of each other; the top one has some transparent cells and some opaque cells. You can move the top table away:
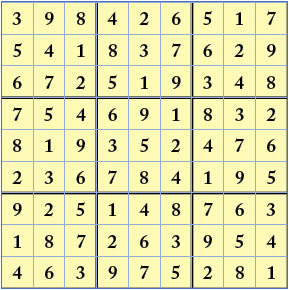
Underneath is the complete solution:
Install
The complete set of three plug-ins allows the automated creation of Sudoku puzzles in InDesign documents. It is well suited for generating single-page Sudoku puzzles as well as multi-page Sudoku puzzle booklets or books.
Please make sure you have a copy of the APID ToolAssistant plug-in installed.
Make sure you install the proper plug-in for your version of InDesign. InDesign CS, CS2, CS3, CS4 and CS5 plug-ins are mutually incompatible.
If you already have an APID ToolAssistant plug-in installed (e.g. because you use one of our other plug-ins), make sure it is up-to-date.
SudokuGenerator will continue to work when the APID ToolAssistant demo expires.
i.e You do NOT need to purchase an additional license for APID ToolAssistant.
When installing plug-ins make sure you copy plug-in files, not the folders they are contained in.
The LightningSudoku.spln file does not have a plug-in icon on Windows – and that’s OK.
Usage
The SudokuGenerator will only work after you open a properly prepared template file. Inside the template file you can put one or more placeholders for puzzles and puzzle solutions – the generator will automatically replace these with real puzzles and the corresponding solutions.
A few example templates are provided in the Example Booklet Files folder. Don’t try to use the CS to CS4 templates with CS5 – it won’t work.
Open sudokuAutoBookletExample.indd in the ‘Example Booklet Files’ folder. Select the ‘API – Generate Sudoku…’ menu item. A dialog should come up. If you click OK, it will go ahead and replace all placeholders with freshly generated puzzles.
Be patient – generating the puzzles is hard work, and can take a substantial amount of time – a larger booklet can easily take 15 minutes to generate.
Also, for larger puzzle collections, InDesign might complain about not being able to undo – if that happens you should simply tell it to go ahead without undo; the warning is harmless and is caused by the massive amount of document changes performed by the generator.
You can adjust the templates to your liking. Re-save as another template under a different name after modifying it.
There are currently five example templates. The templates with ‘…OneByOne…’ in their name will present you with a dialog for each Sudoku puzzle that is being generated. The ‘…Auto…’ templates simply generate the puzzles without interaction. See further how you can control that behavior.
Some puzzles take some time to generate (especially the 16×16) – be patient, also especially if there are many puzzles to be generated.
You can adjust the templates in many ways (change fonts, colors, positions, orientations, add more puzzle placeholders): the trick to making a puzzle placeholder out of a standard 9×9 or 16×16 table is through use of the so-called InDesign script label.
Use the Window – Automation – Script Label menu (in InDesign CS2 and up) or the Window – Scripting – Script Label menu (in InDesign CS) to bring up a palette where you can define a label for the frame.
Click any of the puzzle placeholder frames in the example templates with the normal selection tool – the script label palette will show some info.
Be careful when editing labels: you need hit the tab key, or click your pasteboard after changing the label in the palette or else sometimes your change won’t ‘take’ and will be ignored by InDesign.
Each puzzle is a loose group of one, two, or three frames. The frames are labeled with special labels (which are case sensitive – e.g. the label PuzzleBox is not the same as puzzleBox).
The first (required) frame is the placeholder for the actual puzzle, which is a 9×9 or 16×16 table. This first frame of the group must have a label that starts with the magic prefix ‘puzzleBox‘ – for example: puzzleBox_1, puzzleBox_2,…
The first row of cells in the puzzle table decides what glyphs to use – you can use other glyphs than simply 1,2,3…9. The other cells can remain empty.
The optional second frame is the frame for showing the difficulty level – it must have a script label that starts with ‘difficultyLevelBox‘ – for example difficultyLevelBox_1,difficultyLevelBox_2,…
The optional third frame is the frame for showing the solution. It must have a script label that starts with ‘solutionBox‘ – for example, solutionBox_1, solutionBox_2,…
Frames with the same suffix go together – for example:
puzzleBox_1, difficultyLevelBox_1, solutionBox_1
puzzleBox_2
puzzleBox_3, difficultyLevelBox_3, solutionBox_3
and so on… (the second puzzle does not have a difficulty level frame or solution frame in this example – that’s allowed).
You can put the solution frame on a different page than the corresponding puzzle frame. You can also apply transformations to the solution frame, e.g. rotate it 180 degrees.
To allow finer control over how puzzles are generated, you can put more than one line in the label of the puzzle frames – the additional lines will contain information that directs the puzzle generator.
The first line must always be the frame name (e.g. puzzleBox_1).
If there are no additional lines (i.e. the script label only has the puzzle frane label and nothing else, then a dialog will be shown for the user to decide what kind of puzzle to generate (difficulty, symmetry).
If there are at least two lines in the script label, no dialog will be shown (unless one of the additional lines is ‘dialog‘).
The key words that can appear on the additional lines are:
horizontal
vertical
center
diagonal
backdiagonal
easy
moderate
hard
diabolical
level1:some descriptive text
level2:some descriptive text
level3:some descriptive text
level4:some descriptive text
…
level15:some descriptive text
dialog
The first 5 key words influence the symmetry of the Sudoku puzzle. Don’t pick more than two symmetry options at any one time for best results. Use at least one symmetry option – puzzles without symmetry tend to be markedly more difficult than the ones with some symmetry of the same difficulty level.
The next 4 keywords are for the difficulty level
The ‘level…’ keywords are similar – they also set the difficulty level, but also allow custom descriptions – for example, if you want to generate an easy puzzle in French you would say:
level1:Façile
The descriptive text will appear in the corresponding difficultyLevelBox.
“easy” corresponds to level 2, “medium” to level 5, “hard” to level 7, and “diabolical” to level 10
Have a look at the sudokuAutoBookletExample.indd and then inspect the labels of the various puzzle frames.
The word dialog forces a dialog to appear for the puzzle when it is being generated – normally if a puzzle frame that has additional options in its label it won’t show a dialog to the user, but adding the word dialog will offer the user a dialog where the options can be overridden
Finally, you can also ‘cover up’ any non-hint cells with a copy of a particular frame. Create a small frame (text or image) that’s about the same size as a puzzle cell, for example somewhere on the pasteboard. Then use the the Window – Automation – Script Label menu (in InDesign CS2 and up) or the Window – Scripting – Script Label menu (in InDesign CS) to bring up the palette where you can define a label for the frame, and assign the label cover to it (all lowercase, no spaces before or after).
While the puzzles are being generated, this frame will be copied on top of any ‘non-hint’ cells (i.e. it will cover the white, empty cells).