This tool helps you with threading of text frames in InDesign CS, CS2, CS3, CS4 or CS5. There are three main functions: auto-stitch, quick stitch and auto-unstitch.
Installation
Please make sure you have a copy of the APID ToolAssistant plug-in installed.
Make sure you install the proper plug-in for your version of InDesign. InDesign CS, CS2, CS3, CS4 and CS5 plug-ins, and Mac/Windows plug-ins are mutually incompatible.
If you already have an APID ToolAssistant plug-in installed (e.g. because you use one of our other plug-ins), make sure it is up-to-date.
When installing plug-ins make sure you copy plug-in files, not the folders they are contained in.
TextStitch will continue to work when the APID ToolAssistant demo expires.
i.e You do NOT need to purchase a license for APID ToolAssistant.
Copy the TextStitch.spln into the same folder as the APID ToolAssistant plug-in you installed (typically that will be the InDesign Plug-Ins folder). Don’t worry about the icon of the .spln file: it might not be a ‘regular’ icon, and that’s OK.
Usage
It is highly recommended to assign some keyboard shortcuts to the TextStitch menu items if you intend to use these functions often (using Edit – Keyboard Shortcuts… ).
1. Auto-Unstitch
Auto-unstitch, the first function, will break text threads. There are three options:
– break all text threads on the current spread
– break all text threads in the current document
– break up the whole story of the currently selected text frame
Depending on how you configure TextStitch, the stories will be either ‘broken’ into text chunks (so the document stays visually undisturbed, but the links are gone), or instead ‘bunch up’ in the first frame of each story thread.
One reason to use this function is to ‘freeze’ the pages in a document. Imagine a 100-page document with threaded text throughout. The customer has already signed off on pages 90-100. Now someone makes a text change on page 1, which changes the text flow, ripples through the document and changes how the text looks on pages 90-100. Not good. By using TextStitch you can cut the text frames loose without affecting the layout or look-and-feel – and after that pages 90-100 are immune to any text changes on any of the preceding pages.
Be careful with this function as it will also remove all threads you might have assigned manually.
2. Auto-Stitch
Auto-stitch will automatically thread all unthreaded text frames it finds, in a logical order (roughly left-right, top-down, page order).
It can be configured to either skip over non-empty text frames, or instead indiscriminately stitch empty and non-empty frames alike into the story thread.
It will always ignore any frames that have already been threaded. When frames are positioned in irregular positions, it’ll try to guess a logical order.
This function can be performed either on the current spread, or throughout the complete document.
There is a configuration dialog under the API – Text Stitch – Configure… menu item which allows you to change the setting for the various options.
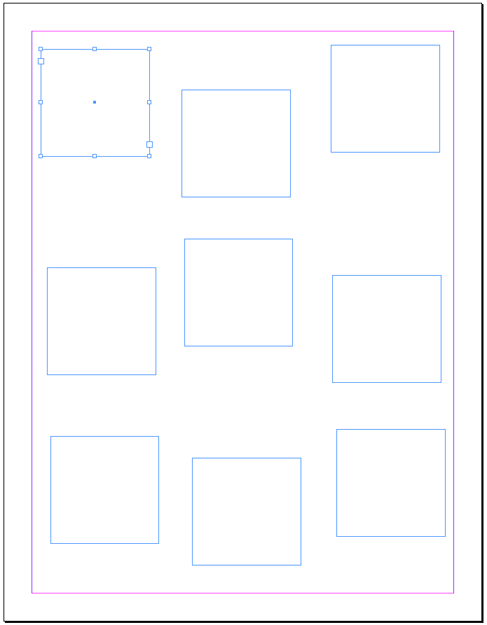
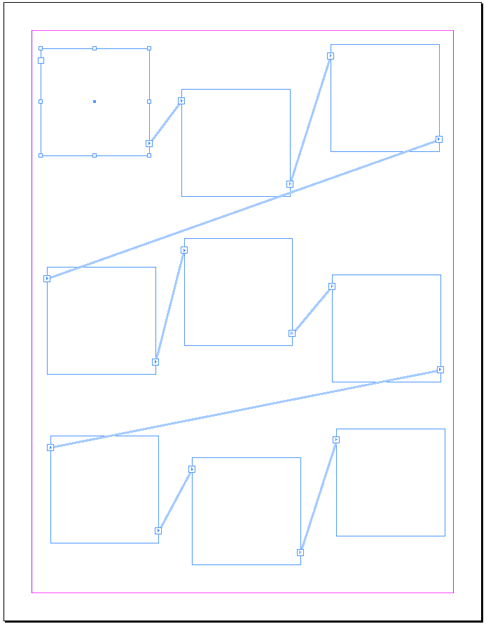
A short example of auto-stitch: consider the following one-page document on which we put some text frames:
First, we verify the current configuration of TextStitch:
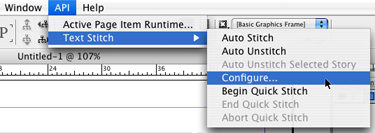
We want to make sure it will only operate on the current spread, rather than affecting the whole document:
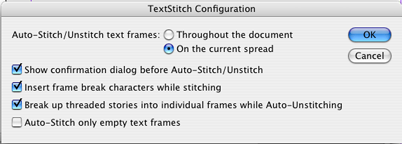
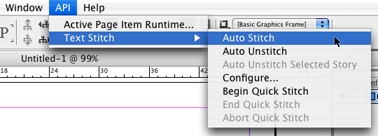
That looks all right, so we close the dialog and ask TextStitch to perform an auto-stitch:
And this is the result (with View – Show Text Threads activated, and the first frame of the newly formed text thread selected):
3. Quick Stitch
The third function, quick stitch, allows you to ‘stitch’ multiple text frames together with just a single click per frame.
Begin the quick stitch mode by selecting the API – Text Stitch – Begin Quick Stitch menu item.
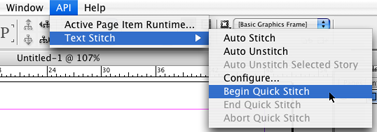
Then use your mouse with the regular selection tool to click the text frames in the desired order, one after the other. Here we are about to click the first frame in the threaded sequence:
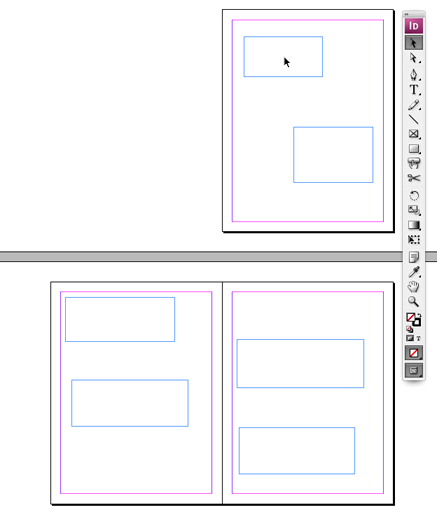
As soon as the frame is clicked, it turns black, making it part of the text thread we are building. If we wanted to, we could click the same frame again, to remove it from the thread, for example if we clicked the frame by mistake.
We continue clicking frames in sequence:
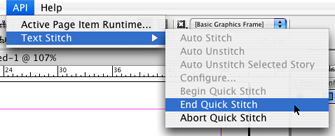
We end the quick stitch by selecting API – Text Stitch – End Quick Stitch (or hitting the hotkey we might have assigned in the Edit – Keyboard Shortcuts… editor).
As soon as we end the quick stitch mode (by selecting the API – Text Stitch – End Quick Stitchmenu item), the text frames will be threaded together in the same order we clicked them.

During ‘quick stitch’ mode, the background of any ‘stitched’ text frame turns black to signal the fact it has been selected for stitching.
The black background will revert back to its original color as soon as the quick stitch mode is ended. You can also click any blackened text frame a second time to remove it from the ‘stitch sequence’.
You can also abort the quick stitch mode, leaving all text frames unchanged, by selecting the API – Text Stitch – Abort Quick Stitch menu item.
You can use quick stitch mode to ‘join’ two distinct stories: simply begin the quick stitch mode, click the last frame of the first story, then click the first frame of the second story, and finally, end the quick stitch mode.
By connecting these two ‘end-frames’ you’ll join up the two stories.
Let us know if this plug-in is useful to you, at [email protected]. Thanks!