What does it do?
JSXGetURL enhances ExtendScript to make it easy to access servers using http, https, sftp… – e.g. to download assets from a remote server.
Download link:
https://www.rorohiko.com/downloads/JSXGetURL.1.1.4.zip
Initially, JSXGetURL operates in demo mode, allowing up to 5 consecutive transfers after a restart of the host app. To continue using the library beyond this limit, activation is required by way of the PluginInstaller (see further).
This version is only for desktop applications. We also have a version specifically for InDesign Server
We provide commercial training and developer support around JSXGetURL: if you need help integrating JSXGetURL into your custom solution, contact us at [email protected] to discuss training and support contracts.
Sample Code
JSXGetURL works with any Adobe Creative Cloud application which have ExtendScript support – InDesign, InDesign Server, InCopy, Illustrator, Photoshop… on Mac and Windows.
All you need to do is copy the JSXGetURL folder to sit alongside your own ExtendScript script, and then add an //@include line at the top of your script.
Sample code:
//@include "JSXGetURL/JSXGetURLLoader.jsx"
var getURL = JSXGetURL();

getURL.addRequestHeader("Accept: */*");
var s = getURL.get("https://www.rorohiko.com") + "";

alert(s.substr(0,1000));

var headers = getURL.getResponseHeaders();
alert(headers);

// Some random FTP file for testing

var f = new File("~/Desktop/sha512.sum");
var s = getURL.get("ftp://cygwin.com/pub/gcc/sha512.sum", f.fsName);

// Some zip file to test binary file download

var f = new File("~/Desktop/FrameReporter.1.1.8.zip");
getURL.get("https://www.rorohiko.com/downloads/FrameReporter.1.1.8.zip", f.fsName);
JSXGetURL is implemented as an ExtendScript DLL/framework, written in C/C++.
PluginInstaller
The PluginInstaller is can be downloaded from
After unzipping, you can relocate the application to a convenient location (e.g., /Applications or C:\Program Files).
There is no installer. Each time you move the PluginInstaller application to a different location on your computer, you need to launch the app once, so it can reconfigure itself.
Demo
Access sample.jsx (with the JSXGetURL folder alongside it) from your host app. E.g in InDesign, you can use the Scripts panel, in Photoshop, you can use the File – Scripts – Browse… menu and browse for sample.jsx, and so on…
Run sample.jsx from the host app.
sample.jsx contains useful code samples (setting options, headers, POST vs. GET…). Please inspect it with a text editor for some useful hints.
Integrating JSXGetURL Into Your Script
Copy the JSXGetURL subfolder to reside next to your own script (.jsx). Look into sample.jsx file for example code.
Modify your script, and at the top, add a line
//@include "JSXGetURL/JSXGetURLLoader.jsx"Then set up your code by mimicking the code you see in sample.jsx, to perform the transfers you need.
Installing PluginInstaller
Download the PluginInstaller from
Mac
If desired, move the PluginInstaller application file to its desired location.
Double-click the PluginInstaller application icon to run the app from its new location at least once.
Windows
If desired, move the PluginInstaller folder for your Windows platform (arm64 vs x86_64) to its desired location.
Navigate into the PluginInstaller folder and double-click the PluginInstaller.exe icon to run the app from its new location at least once.
On Windows, the PluginInstaller folder contains a lot of icons – you’ll need to scroll down a fair bit to see PluginInstaller.exe
Activating JSXGetURL
Standard Account
You need a Standard Account to activate the software.
Start the PluginInstaller.
Create a standard account by clicking the New button, bottom right of the Accounts window.
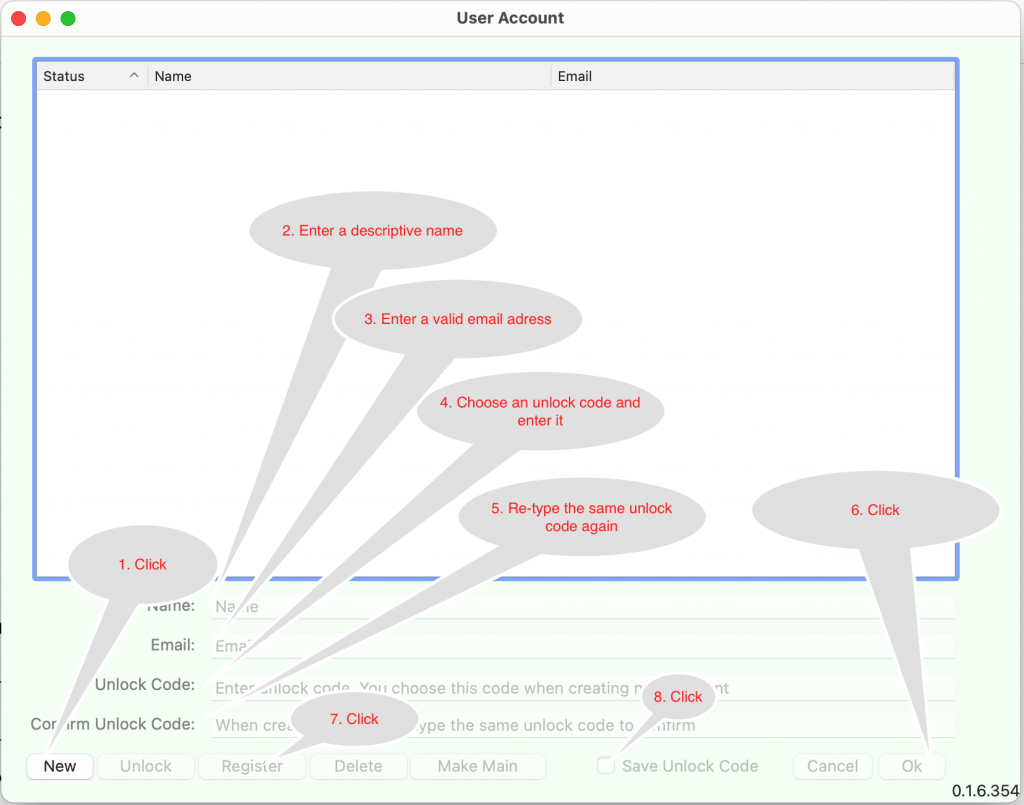
Enter a descriptive name and a valid email address, and choose an unlock code. To avoid typos, you need to enter the same unlock code twice.
Click OK.
After the account has been created, click Register to register the account.
You will receive a confirmation email with a confirmation link.
If the email does not arrive, make sure to check your email spam filter!
Save Unlock Code
Near the bottom of the Accounts window, there is a checkbox Save Unlock Code.
If you’re on a secure personal computer, you should select your account, then tick the box to save the unlock code.
If you don’t save the unlock code, you will need to re-enter the code each time you start the PluginInstaller.
Multiple Accounts
You can create as many accounts as needed. When ordering a license, you will be able to select which account it should be associated with.
It is allowed to re-use the same email address and same unlock code for multiple accounts.
If you do re-use the same email address for more than one account, they become hard to distinguish. Make sure to use good descriptive names, so you can tell the accounts apart.
For example, you might use one account that you keep for your own personal use, and one or more additional accounts that you could use for ordering embeddable JSXGetURL activations to pass on to your customers or colleagues.
Always make sure your account is unlocked before using the PluginInstaller. If you did not save your unlock code, you will need to re-enter the code if the account is locked.
Fetch Product Info for JSXGetURL
Now we need to add the product information for the software to be activated into the PluginInstaller.
Use the Store window in the PluginInstaller, and browse into the Rorohiko Catalog.
Click the entry for the desktop version of JSXGetURL to open the Order a License window in the PluginInstaller.

Create an Order
Enter the number of seats needed.
Type in some order reference that has relevance to you.
Finally, if you have multiple accounts available, you will now need to select the correct account from the popup menu.
Then click the Save button.
This creates a License Request file (.lirq file name extension).

Send us your order
Attach this .lirq file to an email to [email protected].
In your email, make sure to mention any additional details that might be relevant or useful (e.g. let us know if you prefer us to send you a PayPal invoice).
Payment
Payment processing is not yet automated – you need to manually send payment of US$49/seat using PayPal, to [email protected].
With your payment, make sure to mention the order reference that you used in the PluginInstaller, so we can match your payment to the order info embedded in the License Request.
https://www.paypal.comActivation File
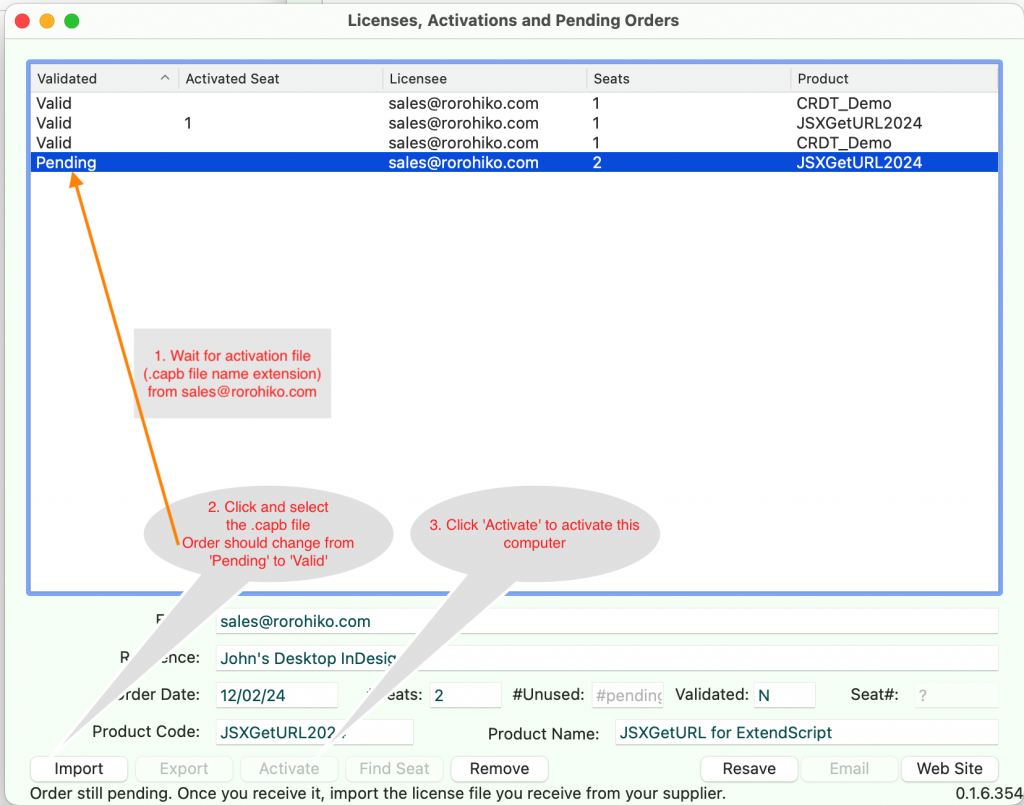
Once we have received your payment, we will email you an activation file for the order, which will have a .capb file name extension. Again, make sure to check your email spam filter!
Start the PluginInstaller and go to the Licenses, Activations and Pending Orders window.
Click Import and import the .capb file.
The PluginInstaller will match this activation file to the pending order.
Activate
In the Licenses, Activations and Pending Orders window you can now select the order entry and click the Activate button to activate your workstation.
The 5-transfer limit will now be removed from JSXGetURL.
Sublicensing/auto-activation
You might want to embed JSXGetURL into your own commercial software, or have JSXGetURL auto-activate so the end-user does not have to handle any activations.
To achieve this, you can embed activation info into your source code or you can work with a separate side-car file.
The embedded activation code ‘knows’ the seat count. If you want to auto-activate multiple systems from a single multi-seat license, you only need to generate a single embedded activation or .actv file, and the same information will activate all the sub-licensed workstations. No need to make individual files for all sub-licensed workstations.
In addition to your standard account (incoming), you also need a separate developer account (outgoing).
The incoming order will be placed using a standard account, and the outgoing sub-license will be tied to a developer account.
First, switch the PluginInstaller to Standard mode via the File – PluginInstaller Mode menu. Purchase a license for JSXGetURL as documented in the previous section.
Once the order is validated and the activation file has been imported, switch the PluginInstaller to Developer/Publisher mode.
If you don’t have a developer account yet, create and register one. Wait for a confirmation email, and make sure to check your spam filter.
The account must be fully registered for this to work: you need to wait and not proceed until the developer account shows a ‘smiley face’ in the accounts window.

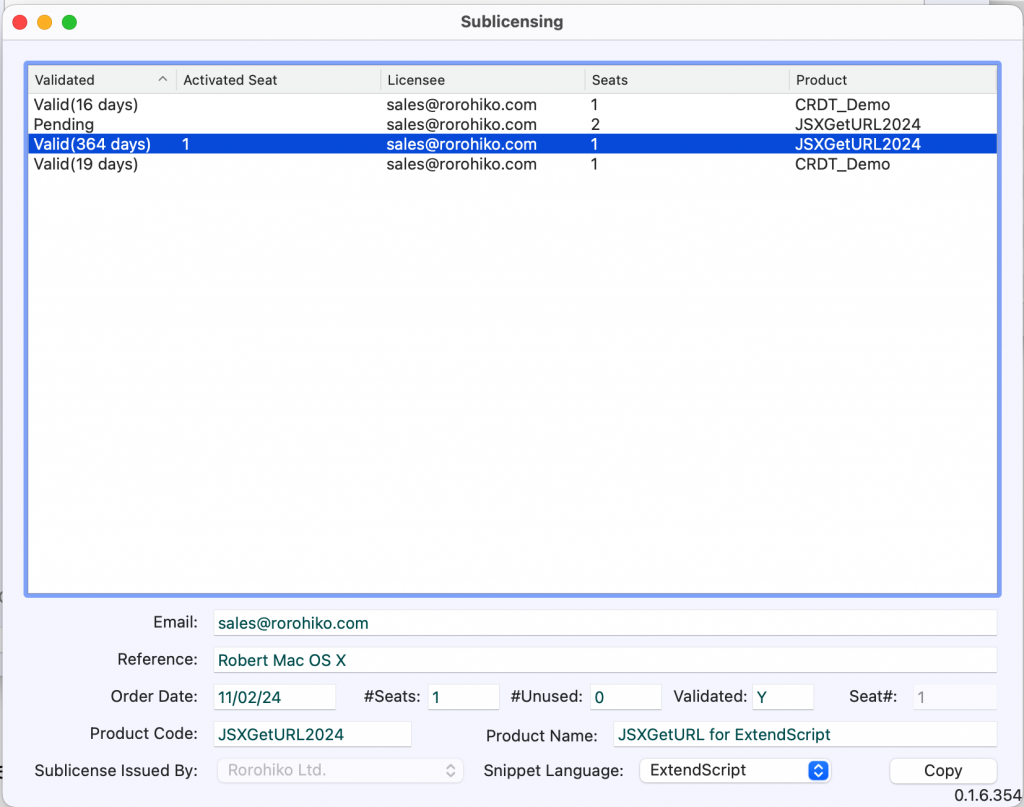
Once you have a registered developer account, go to the Sublicensing window, and select the order.
Embedding
Click the Copy button and then go to your source code, and Paste right after the line in your own source code where you load JSXGetURL:
var getURL = JSXGetURL();so it looks like
var getURL = JSXGetURL();

TIGHTENER.setIssuer("1186cb861234567377c49d7eade","[email protected]");
TIGHTENER.sublicense("hdjshsajdshajdkas..lotsofit...NEmgd0UGH28dbI1RK0GRig==");
The software will now auto-activate when your customer runs it and the user won’t have to deal with activations.
TIGHTENER.sublicense() returns a boolean – it will return false if the activation fails for some reason, so you can verify in code whether the activation succeeded or not.
Sidecar File
Alternatively, you can also change the Snippet Language dropdown to JSON Sidecar.
Click Copy and paste this data into a text file which you then save into a file with an .actv file name extension. You can use any filename that is meaningful to you.
When you install your software, store this file on the user’s computer in the folder ~/Library/Application Support/net.tightener/Licensing/AutoActivations
or %APPDATA%\net.tightener\Licensing\AutoActivations
When you run your software, and invoke JSXGetURL, the activation will happen automatically.
Changing computers
When you need to activate on another computer you can transfer and re-use the same licensing info. Activations can be transferred over.
If you activate your copy of JSXGetURL by way of the PluginInstaller: you can export and import all your account and activation data between computers. Use the File – Export License Info… and File – Import License Info… to manage a transfer.
If you activate your copy by way of the sublicensing mechanism, then the activation will transport automatically.
Note that to avoid abuse, there is a limitation on how frequently you can re-activate: after you activate a seat on a particular computer, you need to wait at least 10 minutes before you can re-activate the same seat on another computer.
Version History
Version 1.1.4, 25-Apr-2024:
- Can now set various CURL options (e.g. to follow redirects).
- Upgraded dependencies: curl 8.7.1, OpenSSL 3.3.0, zlib 1.3.1
Version 1.1.3, 31-Mar-2024:
- No changes to JSXGetURL. Unbundle PluginInstaller to avoid having to update JSXGetURL with each new PluginInstaller version.
Version 1.1.2, 26-Mar-2024:
- No changes to JSXGetURL itself. Improvements to the bundled PluginInstaller.
Version 1.1.1, 22-Mar-2024:
- No changes to JSXGetURL itself. License Manager renamed to PluginInstaller.
Version 1.1.0, 16-Mar-2024:
- License Manager now handles dark mode.
- Fixed a bug with sublicensing/autoactivation on machines that do not have License Manager installed.
Version 1.0.9, 7-Mar-2024:
- Fixed bug in sub-licensing feature: sub-licensed workstations did not always activate, even with a valid
.actvfile orTIGHTENER....code snippet. - The License Manager is the same as with version 1.0.8 – dark mode problems have not been fixed yet.
Version 1.0.8, 26-Feb-2024:
- Improved License Manager
Version 1.0.7, 21-Feb-2024:
- Fixed an issue with License Manager unable to activate
Version 1.0.6, 20-Feb-2024:
- Fixed an of issue with sublicensing using sidecar files
Version 1.0.5, 19-Feb-2024:
- Fixed a number of issues with sub-licensing and sidecar activation files.