Our apologies for the fact that our plug-ins are not exactly straightforward to install. We know it’s not easy!
The quickest way to get up and running is to spend some time reading the information below.
Here’s a table of contents for quick navigation:
You Must Read This Before Emailing Us
About Rorohiko
Rorohiko is a very small company, and we don’t have extensive resources.
For the sake of efficiency, you must work through the problem-solving information presented on this web site.
In 90% of the cases, that will allow you to resolve the issue.
Only when you are really stuck should you email us.
Keep in mind that at Rorohiko there’s only a single person to
– provide custom development and consultancy (priority #1)
– maintain the web server
– maintain the software library
– provide free tech support
Rorohiko is physically located in New Zealand, which can make for awkward time zones: Friday afternoon in the USA is Saturday morning in New Zealand. Also, sometimes we might take a bit of time off and go fishing.
While we try to respond to emails quickly, there are times when it can be multiple days before you get a response.
Free Tech Support: How To Email Us
When you email us, you must check our email instructions a bit further down, and make sure follow them.
If you email us without following the instructions, you’ll get an automated reply that points you to this page.
As it is, our software sales cover only part of our total cost of providing our range of software to the creative community. Providing free tech support is another cost to us. It takes time away from paying consultancy and projects.
Before you can expect a human to reply back, your email must mention or include:
– The software you’re having trouble with (e.g. TextExporter, TextStitch, Soxy,…)
– The platform you’re on (Mac, Mac OS X version or Windows, Windows version, whether it is 32-bit or 64bit)
– The version of InDesign you’re using (if applicable)
– The language of InDesign (if applicable)
– Screenshots that show us the contents of the APID ToolAssistant window, the contents of your Plug-Ins folder and/or the contens of the Rorohiko folder inside the Plug-Ins folder
– Screenshots that demonstrate why you cannot apply the information on this web page to resolve your issue.
Resolving Issues
Resolving Activation And Licensing Issues
For any activation and licensing issues, please take the time to read https://www.rorohiko.com/licensing. Most questions are answered there.
Resolving Installation Issues
For installation issues, please read on, and work through the info on this page before emailing us.
It’s easy to get it wrong, especially since for some plug-ins we support InDesign CS all the way up to CC 20xx. There are lots of different versions to choose from. It’s also a lot of different versions for us to support!
It means that you might need a bit of persistence in order to get our plug-ins installed.
In an ideal world, there would be installer programs for all our plug-ins. Sadly enough, writing installers is a costly and intensive undertaking. Our plug-in software does not generate enough income to warrant the expense.
We do have a single installer for just one of our plug-ins, TextExporter. The installer works fine most of the time, but in some cases, you can run into some permission issues. When that happens, you need to install TextExporter manually by copying files across, using the same procedure as with the other plug-ins.
Initial Questions/h2>
Administrative Account
For any of these manual installations, you must have an account with sufficient permissions. If you work in a large organization, and your account is standard, restricted user account, you won’t be able to install our software.
In that case, you need to ask for the help of your I.T. department.
Deprecated Tools
We have retired a number of tools:
– ActionRecorder
– BoxedStepAndRepeat
– ClipAThing
– Conditional Text Groups
– FramedWeb
– HistoryLog
– ImpositionCompanion
– LikeFindsLike
– MagnetoPaths
– PlaceAndScale
– PlaceAutoSynchronizer
– Repeat After Me
– SendStyles
– SendToMaster
– SimpleStyles
– StylePainter
– Tada! QR
These tools are unmaintained, and we don’t provide any further tech support for them. They’re still available for download, but you download and use them at your own risk.
Furthermore, a number of these older tools don’t work with the latest version of APID ToolAssistant. If you absolutely need to use one of these, make sure you download the older version of APID ToolAssistant that is shown on their product pages.
Installing such older version of APID ToolAssistant will disable any of the more recent plug-ins like TextExporter, StoryParker – it’s an either/or.
Re-download The Software
If you had installed our software successfully before, please first make sure you have installed the latest versions of everything.
Many installation issues are caused by outdated or incompatible software versions.
It often helps to start from scratch. First, remove any files from a previous installation attempt.
Then re-download all components to make sure you have up-to-date materials.
The easiest way to find the various product pages is to go via our InDesign Downloads page.
TextExporter Installer Failure
On some Macs, the TextExporter Installer does not work.
If you inspect your InDesign Plug-Ins folder (see further down for help finding it), you might find a ‘Rorohiko’ folder with a red stop sign. This means your computer has some permission issue.
If that’s the case, you must first remove the offending Rorohiko folder.
Then revisit the TextExporter download page (https://www.rorohiko.com/textexporter), and click the ‘Manual Install’.
Then follow the manual installation instructions.
Diagnostic Steps
You might want to print this page out so you can ‘tick’ each step as you work through it.
Please follow the instructions as accurately as possible – e.g. if we say “restart InDesign and open a document” you really need to open a document after restarting InDesign.
If you find any inaccuracies in the procedures below, please let us know at [email protected]
Step 1. First, restart your computer.
Then launch InDesign, and check whether there is an API menu.
If you can see the API menu, skip to step 2.
If you cannot see the API menu, exit or quit out of InDesign and navigate to the InDesign application folder (or directory) on your hard disk.
If you need help finding the InDesign application folder on Macintosh, click here.
On Windows, you need to determine whether you are on a 32-bit or a 64-bit version of Windows, and whether you are using a 32-bit or 64-bit version of InDesign.
If you need help determining that, click here.
If you need help finding the InDesign application directory on Windows, click here.
Inside the InDesign application folder, you’ll find the Plug-Ins folder.
This is where you need to copy a number of files to make things work.
You can either copy the items straight into the Plug-Ins folder (which is easy, but a bit messy), or you can create a subfolder called ‘Rorohiko’, then install everything in the Rorohiko folder below the Plug-Ins folder (which is a bit harder, but tidier).
After copying one or more items you should restart InDesign.
Make Sure To Use The Correct Version Of APID ToolAssistant
We will first verify whether APID ToolAssistant is correctly installed.
There are many versions of APID ToolAssistant: Mac versions, Windows versions. We have a CC 2014 64-bit Windows version, a CS5 Mac version available… and so on: there are now many tens of different versions available for download.
And all of these are mutually incompatible.
If you install a Mac version onto a Windows computer, or a CC 2015 version on InDesign CC, or a 32-bit plug-in into a 64-bit InDesign, it won’t work.
If you have multiple versions of InDesign installed, make sure you’re not mixing up two installations.
An overview:
| Platform | File(s) to put into Plug-Ins folder |
| Mac InDesign CS: | APIDToolAssistantCS.pln |
| Mac InDesign CS2: | APIDToolAssistantCS2.pln.framework |
| Mac InDesign CS3: | APIDToolAssistantCS3.InDesignPlugin |
| Mac InDesign CS4: | APIDToolAssistantCS4.InDesignPlugin |
| Mac InDesign CS5: (2 items) |
APIDToolAssistantCS5.InDesignPlugin APIDToolAssistantUICS5.InDesignPlugin |
| Mac InDesign CS5.5: (2 items) |
APIDToolAssistantCS5.5.InDesignPlugin APIDToolAssistantUICS5.5.InDesignPlugin |
| Mac InDesign CS6: (2 items) |
APIDToolAssistantCS6.InDesignPlugin APIDToolAssistantUICS6.InDesignPlugin |
| Mac InDesign CC: (2 items) |
APIDToolAssistantCS7.InDesignPlugin APIDToolAssistantUICS7.InDesignPlugin |
| Mac InDesign CC 2014: (2 items) |
APIDToolAssistantCS8.InDesignPlugin APIDToolAssistantUICS8.InDesignPlugin |
| Mac InDesign CC 2015: (2 items) |
APIDToolAssistantCS9.InDesignPlugin APIDToolAssistantUICS9.InDesignPlugin |
| Windows InDesign CS: | APIDToolAssistantCS.pln |
| Windows InDesign CS2: | APIDToolAssistantCS2.pln |
| Windows InDesign CS3: | APIDToolAssistantCS3.pln |
| Windows InDesign CS4: | APIDToolAssistantCS4.pln |
| Windows InDesign CS5: (4 items) |
APIDToolAssistantCS5.pln (APIDToolAssistantCS5 Resources) APIDToolAssistantUICS5.pln (APIDToolAssistantUICS5 Resources) |
| Windows InDesign CS5.5: (4 items) |
APIDToolAssistantCS5.5.pln (APIDToolAssistantCS5.5 Resources) APIDToolAssistantUICS5.5.pln (APIDToolAssistantUICS5.5 Resources) |
| Windows InDesign CS6: (4 items) |
APIDToolAssistantCS6.pln (APIDToolAssistantCS6 Resources) APIDToolAssistantUICS6.pln (APIDToolAssistantUICS6 Resources) |
| Windows InDesign CC (32 bit): (4 items. Make sure to use the contents of the ’32bit’ directory) |
APIDToolAssistantCS7.pln (APIDToolAssistantCS7 Resources) APIDToolAssistantUICS7.pln (APIDToolAssistantUICS7 Resources) |
| Windows InDesign CC 2014 (32 bit): (4 items. Make sure to use the contents of the ’32bit’ directory) |
APIDToolAssistantCS8.pln (APIDToolAssistantCS8 Resources) APIDToolAssistantUICS8.pln (APIDToolAssistantUICS8 Resources) |
| Windows InDesign CC 2015 (32 bit): (4 items. Make sure to use the contents of the ’32bit’ directory) |
APIDToolAssistantCS9.pln (APIDToolAssistantCS9 Resources) APIDToolAssistantUICS9.pln (APIDToolAssistantUICS9 Resources) |
| Windows InDesign CC (64 bit): (4 items. Make sure to use the contents of the ’64bit’ directory) |
APIDToolAssistantCS7.pln (APIDToolAssistantCS7 Resources) APIDToolAssistantUICS7.pln (APIDToolAssistantUICS7 Resources) |
| Windows InDesign CC 2014 (64 bit): (4 items. Make sure to use the contents of the ’64bit’ directory) |
APIDToolAssistantCS8.pln (APIDToolAssistantCS8 Resources) APIDToolAssistantUICS8.pln (APIDToolAssistantUICS8 Resources) |
| Windows InDesign CC 2015 (64 bit): (4 items. Make sure to use the contents of the ’64bit’ directory) |
APIDToolAssistantCS9.pln (APIDToolAssistantCS9 Resources) APIDToolAssistantUICS9.pln (APIDToolAssistantUICS9 Resources) |
If in doubt, start over: remove the APID ToolAssistant, and re-download it from the following page:
https://www.rorohiko.com/apidtoolassistant
Once you get APID ToolAssistant to show up, any additional files (.spln files, additional plug-ins like Color2Gray or Sudoku, .png files with graphical elements) will also need to be copied into the Plug-Ins folder.
Things to watch our for:
Our downloadable material is contained in compressed .ZIP files. These .ZIP files won’t work if you drag them into your Plug-Ins folder.
You need to decompress them so you can get at their contents. It is easiest if you first put the downloaded .ZIP file(s) on your desktop, then decompress them.
Double-check any file(s) you added in your Plug-Ins folder do not have a .ZIP file name extension.
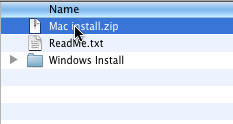
Sometimes you’ll find a .ZIP inside a .ZIP. You must decompress those too.
Check the file name extensions of the files you gave copied into the Plug-Ins folder.
Acceptable file name extensions for stuff you put into the Plug-Ins folder can be (depending on the platform): .pln, .pln.framework, .InDesignPlugin, .spln, .png
If you need help decompressing the .ZIP file on Macintosh, click here
If you need help decompressing the .ZIP file on Windows, click here
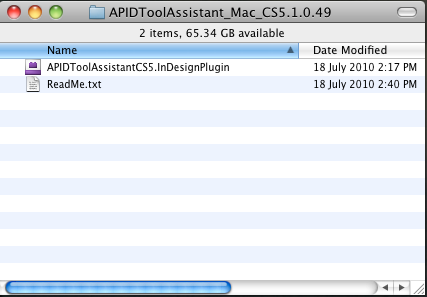
Navigate into the decompressed folder – below a sample of what it would look like for InDesign CS5 for Macintosh.
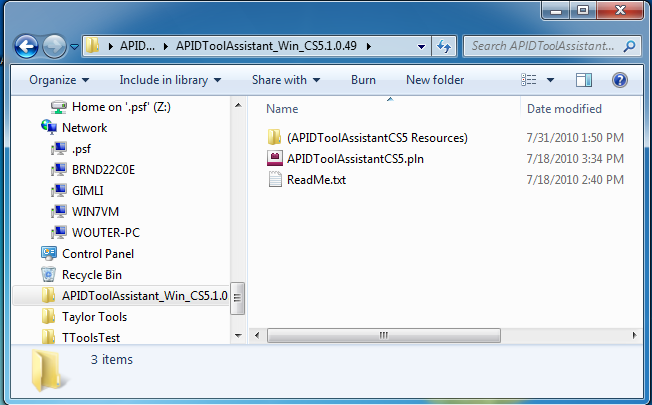
And here is a sample of what it would look like for InDesign CS5 in Windows. InDesign CS5 on Window is a special case – you need to copy two items. Both the .pln file and the resources folder need to be copied.
Don’t copy the ReadMe.txt into your Plug-Ins folder.
After decompressing, you need to drag the correct plug-in into your InDesign plug-ins folder.
Some of our .ZIP files contain nested .ZIP files – decompress these too in the same way, until you can get at the file you need.
After you have successfully installed the plug-in and verified it works, you can file away or delete the downloaded .ZIP file and delete the decompressed folder from your desktop – you don’t need them any more.
Relaunch InDesign. If you can see the API menu, skip to step 2.
If you cannot see the API menu and you are on Windows using InDesign CS5, click here.
If you cannot see the API menu and you are on Windows using InDesign CS4, click here.
Restart your computer. Start InDesign.
If you can see the API menu, skip to step 2.
If the API menu still fails to appear, you might need to do a reset of the InDesign preferences.
First, try creating a temporary user account and see whether things work when logged in as another user. Click here for more info.
If things do work from a temporary user account, you need to reset your preferences.
This will remove all customizations you have done – so it’s not a decision to take lightly, but sometimes there is no way around it.
If you need help resetting your preferences on Macintosh, click here.
If you need help resetting your preferences on Windows, click here.
Relaunch InDesign. If you can see the API menu, skip to step 2.
If you still cannot see the API menu, you can try a ‘deep reset’.
To do a ‘deep reset’ of your InDesign preferences on Macintosh, click here.
To do a ‘deep reset’ of your InDesign preferences on Windows, click here.
Relaunch InDesign. If you can see the API menu, skip to step 2.
If you still cannot see the API menu probably something is really wrong – the most common cause is some installation problem with your computer.
This can be caused by all kinds of things: permission problems, corruptions, software conflicts, bad Windows updates, viruses…
If you end up at this point, and you feel out of your depth – seek help from someone knowledgeable who can help you diagnose and resolve the issue.
You can also e-mail us at [email protected] – please provide us with ample information.
Try to provide us with the following info – we cannot see your screen or your computer, so you need to be our eyes:
– tell us what tool are you trying to install. Too many people e-mail us ‘it does not work’ and leave us guessing what ‘it’ might be.
– what platform (Windows/Mac) and version of InDesign you are using
– screen shots. At least a screen shot of the API – APID ToolAssistant… window, and anything else that might be relevant
– sample documents (preferably small).
– any crash reports you might have
– a system profile if you are on Macintosh
– where we can reach you (in case your e-mail does not work) – a phone number, a fax, an alternate e-mail address.
– anything else you think is relevant.
Things to try:
– Create a new user account on your computer and try again.
– Try on another computer.
– Reinstall InDesign (argh!) and try again.
– Reinstall the operating system (oomph!) and try again.
Step 2. Open a new document in InDesign.
Most of our tools don’t appear in the API menu until you have a document open.
Check the API menu – do you see the menu items corresponding to the tool you installed (e.g. TextExporter, Color2Gray…) ?
If you can see the menu items, the tool is properly installed. Go to the product page to read more about how the tool is used – the easiest way to find the product page is to go via our InDesign Downloads page. Click here to go to the InDesign Downloads page.
If you cannot see the menu items, the tool is not properly installed. Read on.
APID ToolAssistant all by itself has no useful functionality for an end-user – it needs to be complemented with one or more .spln files and possibly some additional plug-ins.
Nearly all of our tools necessitate two downloads: one download is APID ToolAssistant, the second download is the tool you want to install. After the downloads you need to decompress the .ZIP files, and copy two, three or more items to your InDesign Plug-Ins folder.
Make sure you download the tool you desire to install, and copy the relevant file(s) into your InDesign Plug-Ins folder.
Any additional files (.spln files, additional plug-ins like Color2Gray or Sudoku, .png files) need to be copied into the Plug-Ins folder also.
The InDesign Plug-Ins folder resides in the InDesign application folder.
If you need help finding the InDesign application folder on Macintosh, click here.
If you need help finding the InDesign application folder on Windows, click here.
Make sure none of the file(s) in your Plug-Ins folder have a .ZIP file name extension.
Acceptable file name extensions for stuff you put into the Plug-Ins folder are (depending on the platform): .pln, .pln.framework, .InDesignPlugin, .spln, .png
Our downloadable material is contained in compressed .ZIP files. These .ZIP files won’t work if you drag them directly into your Plug-Ins folder.
You need to decompress them so you can get at their contents. Put the downloaded .ZIP file(s) on your desktop.
If you need help decompressing the .ZIP file on Macintosh, click here
If you need help decompressing the .ZIP file on Windows, click here
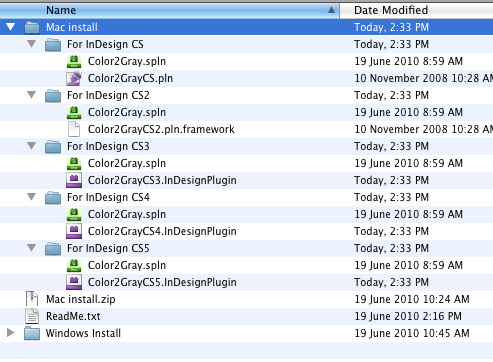
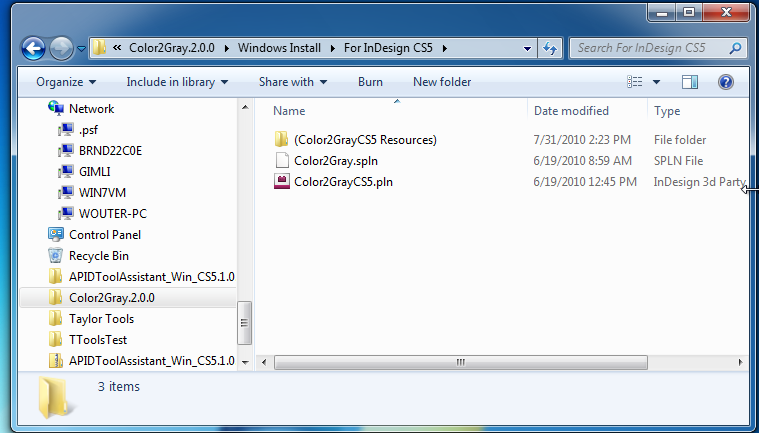
Below a sample of what it could look like for Color2Gray for InDesign CS5 on Windows.
After decompressing, you need to drag the .spln file or files into your plug-ins folder, as well as any additional plug-in files (.pln), resource folders (parenthesized name), and possibly some additional graphics files (.png).
Some of our .zip files contain nested .zip files – decompress these too in the same manner, until you can get the file you need.
After you verified all necessary items are installed, relaunch InDesign, and open a document.
If the menu items for the tool still fails to appear in the API menu, you might need to do a reset of the InDesign preferences.
First, try creating a temporary user account and see whether things work when logged in as another user. Click here for more info.
If things do work from a temporary user account, you need to reset your preferences.
This will remove all customizations you have done – so it’s not a decision to take lightly, but sometimes there is no way around it.
If you need help resetting your preferences on Macintosh, click here.
If you need help resetting your preferences on Windows, click here.
Relaunch InDesign and open a document.
If the menu items for the tool still fails to appear in the API menu, you might need to do a ‘deep reset’ of the InDesign Preferences.
To do a ‘deep reset’ of your InDesign preferences on Macintosh, click here.
To do a ‘deep reset’ of your InDesign preferences on Windows, click here.
Relaunch InDesign and open a document.
If you still cannot see the menu items for the tool probably something is really wrong – the most common cause is some installation problem with your computer.
This can be caused by all kinds of things: permission problems, corruptions, software conflicts, bad Windows updates, viruses…
If you end up at this point, and you feel out of your depth – seek help from someone knowledgeable who can help you diagnose and resolve the issue.
You can also e-mail us at [email protected] – please provide us with ample information.
Try to provide us with the following info – we cannot see your screen or your computer, so you need to be our eyes:
– tell us what tool are you trying to install. Too many people e-mail us ‘it does not work’ and leave us guessing what ‘it’ might be.
– what platform (Windows/Mac) and version of InDesign you are using
– screen shots. At least a screen shot of the API – APID ToolAssistant… window, and anything else that might be relevant
– sample documents (preferably small).
– any crash reports you might have
– a system profile if you are on Macintosh
– where we can reach you (in case your e-mail does not work) – a phone number, a fax, an alternate e-mail address.
– anything else you think is relevant.
Things to try:
– Create a new user account on your computer and try again.
– Try on another computer.
– Reinstall InDesign (argh!) and try again.
– Reinstall the operating system (oomph!) and try again.
